


| Jump down this page to: |
Startup Issues and Errors Hangs and Unresponsive apps Communications, eMail Problems Printers and Peripherals Kernel Panics ("You need to restart...") |
 Check Drive storage and free space: Two ways to find drive capacity and free space:
 1. Find drive icon on your desktop, should be in top-right corner of screen. (If not, see Finder menu > Prefs/Settings and click show drive). Once you find your drive's icon, select it with one click, then go under Finder's File Menu and select "Get Info" with drive selected (example below). Or: 2. Open the Apple Menu (top-left corner of Menu Bar), select "About This Mac" then click "Storage" tab and do the math.
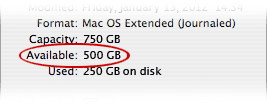 Drive's Get Info window shows drive capacity, space available and used space. If available space is 10% or less of drive capacity, drive is full and you should get a warning that your startup disk is full. You can ignore this warning if you want, but know that ops will slow to a crawl and machine will eventually refuse to startup if disk is full.
Example above shows a 4TB drive with 409GB available free space, right at 10% of drive's total capacity. Your results will vary....
Not that it helps any, but there are:
1,024 bytes in a Kilobyte
1,024 Kilobytes in a Megabyte
1,024 Megabytes in a Gigabyte
1,024 Gigabytes in a Terabyte
1,024 Terabytes in an Exabyte - and so on.
Gargantuan numbers composed of ones and zeros....
About This Mac (Apple menu) 
Open the Apple Menu (top-left corner of screen) and select "About This Mac." Here you'll find your MacOS version, processor info, name of your startup disk, year (maybe), and machine's serial number.
Much more complete and detailed specs may be found in the System Profile by clicking "More Info" or "System Report" button, which shows detailed specs of all internal components from the System Profile. Newer OS versions go from "About This Mac" to System Settings window where you'll see the System Report button at bottom.
The System Profile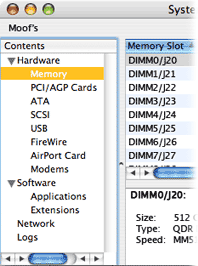
Illustrated here is System Profile's Memory pane. Selected in left column, memory (RAM) shows specs for each installed memory module or DIMM (Dual Inline Memory Module). Detailed info is available for every component in the System Profile.
Unfortunately, Apple discontinued any/all upgrade options in 2016, except possibly the towers. Both RAM (memory) and storage (drive) are now "onboard," meaning both are soldered direct to logic board.
If you use a notebook computer, you'll also find battery condition and charging status in System Profile under Profile's "Power" heading. Serial Number All Macs have their serial numbers recorded in "Hardware" at the top of the System Profile window, also listed in "About This Mac" window. Serial number may also be found on back of MacBooks in wee-tiny print (or on a label inside battery bay of ancient laptops with removable batteries). iMacs have serial number and machine specs conveniently located on underside of stand, towers have a label under side door or on back panel. The serial number may be used to ascertain warranty status and identify machine specs.
Model Number For some inexplicable reason, Mac model numbers are seldom used to identify individual models, even tho every machine has one. Macs are best identified by the specs on their labels, details in System Profile, or by machine's serial number. Other identifiers include order number (ending in LL/A), two digit code within System Profile's Hardware pane, machine's CPU speed and type, and sometimes by machine's year+CPU. Using model numbers would be too easy and not nearly nerdy enough.
|
 Start with an overall examination - with no assumptions If your iMac, Mini or tower is doing absolutely nothing - no chime on startup, no fan, no sign of life at all - odds are the power supply has failed. Laptops that aren't getting power will run on battery until drained, then - nothing. Test and confirm power from outlets and check connections. bypass any surge suppressors or power supplies (UPS), and try a different outlet.
If power isn't the problem, try going thru the inspection process below as though you're seeing the machine for the first time. Some steps may seem unnecessary, but try 'em anyway, just in case. Be methodical.  Power down if necessary Shutdown, then disconnect power to machine and unplug all peripherals. Two reasons for this: First, it eliminates any possibility of damage that might be caused by disconnecting/reconnecting powered devices. Second, removing power from computer and all components for a minute or two (including printer, modem, router, and all) will cause some devices to reset when powered on again, thus eliminating a few possibilities right off the bat.
Initial examination
While things are shut off and unplugged, take a good look at cables, plugs and ports. Are contacts clean and shiny, straight, intact and in good shape? Any debris stuck in ports? Damaged cables should be replaced, but damaged ports may be another matter; try a different port if available. Carefully clean connectors as needed, blow out ports and sockets, then reconnect devices. Make sure plugs have a snug fit and cables aren't being strained, twisted or bent. If a new device has been added recently - including any internal PCI cards - remove it and leave that device aside for now, to be added back later. (Hardware problems often manifest themselves during startup or sleep/wake functions, causing freezes, hangs or blank screens.)
AC-adapters (aka notebook chargers) Power problems, including battery issues and startup failures, are sometimes symptoms of cheap, bogus adapters. These can cause damage and overheat if machine draws more current than adapter can produce. Use genuine Apple chargers rated to proper wattage for your Mac. More about AC-adapters: https://support.apple.com/en-us/HT203207 Reconnect power and startup
Try startup with no devices connected. If successful, connect one device at a time and test machine. Or, connect and power-up peripherals first (printer, display, ethernet, USB devices, etc,) and allow each to go thru its startup routine - then startup your Mac and see if problem remains or reoccurs. If you've added a new device recently, try running without it for a bit, then connect the new device and see if anything changes. If problem never went away or startup to (desktop) is impossible, the next steps may be unavailable and you might want to bring machine in.  Failureto complete startup (powers on) Make a note of what - if anything - appears on the screen and how long it takes to get there. If machine sounds like it is starting up normally but screen remains black, try to brighten the screen (usually the F2 key at top of keyboard). If it's still dark, shine a flashlight on the screen and look for a ghost image of what should be visible - the login screen or desktop image. If you see anything without screen lighting up, you've lost the backlight and will need to replace display.
If you can shutdown normally, do so. If not, hold power button down for 6+ seconds until machine goes off. Next, try startup from Recovery: Hold the Command + R keys down and momentarily press power button to startup. Continue holding Command + R until you see the Apple logo, then release keys and be patient; startup from Recovery takes a bit longer than normal. You should arrive at a screen where you pick a language and continue, but eventually you should be presented with four options. The one we're interested in is Disk Utility - choose Disk Utility. You should then see your drive in left column, with first line showing drive identifier and possibly drive's name under line 1 ("Macintosh HD"). Select first line (drive type) and click Verify or Repair Disk. This checks drive format and function; if successful it will say so. If an error is found, it will show in red and advise acordingly. If you have the opportunity to repair, click Repair Disk and see if repair is successful. Continue with next step in either case. Next, select second line with drive name and click Verify Disk again. This time it will check directories and will take a few minutes to do so. As before, if a problem is found it will appear in red - make a note of it. If you have the opportunity to repair, click Repair Disk. If not, shutdown. NOTE: If you do not see your drive in left column, drive is not mounting and testing is done. Normally you'd see a folder with blinking question mark on startup, indicating no OS available. Hold power button until machine shuts off.  Check System Prefs 
If you startup to a date/time error message, your desktop computer's PRAM has been erased or clock battery may be dead (very rare, desktop machines only). Replacement batteries are readily available for desktop Macs, but will require disassembly for access. (Notebooks have no PRAM battery, relying on main battery to maintain settings.)
Open System Preferences and check settings in relevant control panels and panes, and set date/time if necessary. Check Startup Disk and select your drive if it isn't highlighted already. Look in Users and Groups > Login Items and see if there is something launching on startup that might be the culprit. NOTE: Now is not the time to change anything other than those settings that may be related to the specific problem at hand; you're likely to see login items installed by your OS that should remain. Third-party (non-Apple) items are always suspect and may be removed.
Try to isolate the problem
Record any error messages that appear. Is the problem repeatable? Did a specific action or event precede the problem? Does it seem to be related to a particular application? If so, check the program's preference settings. If problem appears to be related to an external device, make sure any necessary driver is current by checking version numbers and system requirements. (Drivers on CDs included with most devices may be unnecessary for use with Macintosh, or they may outdated at time of purchase.) If you've done an OS upgrade, you may need to download/update your printer driver, but drivers in general are seldom a problem on Macs.
Before you call for help
Regardless of where you might turn for assistance, you'll save yourself time and trouble by having the following information readily available:
The amount of relevant information you have on hand when you call tech support will determine a lot of your success in receiving help. From a tech's point of view, it's much easier to have a coherent conversation when both parties know what equipment is in use, under which Operating System, and exactly what errors or symptoms are being generated.
NOTE: Using Google to search for "customer support" will likely produce a top hit with a toll-free number leading to offshore scammers. Carefully read the actual web address before clicking any link, and go to vendor's genuine web site to obtain a _real_ contact number. If your Mac is under warranty, you may be entitled to free tech support - check your warranty info (also available by serial number from Apple's support page found under our Apple links). Most hardware/software vendors charge for support by incident. We don't provide free tech support, either. In fact, it's rare to diagnose a problem over the phone, let alone solve it. See our Service Policies and Ops page for details. |
 Oooo, pretty! First, be patient; the beachball cursor is there to indicate machine is busy. But, if it seems stuck for too long, there's a "Force Quit..." command under the Apple (logo) menu that should get you out of it. If that's not an option, you might have to force shutdown by pressing/holding power button for 6+ seconds which will end a hang and shutdown machine. Try startup and ops to see if problem was solved - but don't be surprised if it happens again. If you want to prevent beachballs in the future, or you find it's happening far too often and for too long, then something needs to be corrected.
And the cause is...?Common causes of slow ops - from minor to major - include:
"Slow" is a pretty vague complaint, and it helps to know if slowness is related to a particular program - web browsers for example. Browsers collect a lot of so-called "cruft" these days, a term encompassing cookies, history, location info, icons, autofill and other data. A good habit to get into these days is to clear cruft when quitting your web browser (Safari, Firefox, etc.). If slow operation is system-wide and not limited to a particular app, a little more investigation may be required.
More complex causes: Internet downloads
Bogus utility and trouble-shooting apps can do more harm than good when installed, and some are actually malicious. Many will slow ops to a crawl. Purloined programs downloaded from offshore sources (torrent or "file-sharing" sites) are always suspect and frequently cause trouble - which is to be expected, since you're dealing with thieves. Garbage may come onboard pretending to be Flash Player, a "viewer," update, search assistant, cleanup utility or virus scanner. One notorious example is MacKeeper, an insidious scam that can be difficult to remove. If you were unfortunate enough to install any version of MacKeeper (paid or free demo), it will have to be removed manually; MacKeeper's "uninstaller" doesn't, and trashing the MacKeeper app won't remove it, either.
There are countless other browser extensions, bogus utility apps, adware and malware on the internet hoping to get into your Mac; see the Security and Protection page for info on how to deal with junk apps. Insufficient memory (RAM) Modern OS versions can consume a lot of RAM. 8GB may be sufficient, 16GB seems to be normal these days. If RAM is inadequate, everything will be slow as System is forced to compensate, especially if there are multiple apps open. RAM is working space, with OS loaded into it along with open apps. Freezes/hangs may result from running out of memory or having too many apps running simultaneously. (Polite apps might warn you before they run out of memory, but don't count on it.)
Amount of RAM required depends on what you use your computer for, and some apps require much more RAM than others. Quit apps you're not using. A simple shutdown and restart might help, too, if your machine sleeps when not in use and seldom gets shutdown. Shutdown at least once per month. Other possible causes related to slow, unresponsive Macs include failing or full drives, corrupt (damaged) or missing System segments, wacky apps, optical drives or peripherals gone wild, and a whole slew of other things. A damaged input device can mimic a freeze, too.
|
 Is mail down or is all internet offline? Either way, you might find a solution below.
Mail.app has a "Connection Doctor" function that might offer a clue as to what has gone wrong if you are suddenly unable to send and/or receive email. Try it. But before assuming your computer is to blame, eliminate a few other likely suspects. POP/IMAP = incoming mail settings, SMTP = outgoing mail settings. If Mail keeps asking for your password, and you haven't changed anything, the problem might be on the server end. Some ISPs post network status on their web sites, but most avoid mentioning down time. If server is down, you will probably receive an erroneous message that your user name or password is incorrect until service is restored. Write down your email settings if you haven't already (user name, password, POP/IMAP settings, port numbers, SSL yes/no and all SMTP settings). If you change anything, these will have to be changed back to the working set. Check hardware, cables and devices
First, reset modem and router: Unplug power to each device for 10 seconds, then plug them back in and watch lights as they restart. Those lights indicate signal and status, so if they all eventually light up correctly they have reset and should be operational. A modem failure stops all internet ops, not just mail. A failed router can be bypassed by connecting computer directly to the modem with an ethernet cable, then testing mail/internet.
Service providers also make periodic changes that might mess things up, like the switch from POP to IMAP protocols, a new web mail program, spam filter or security feature. If you've been ignoring messages from your ISP regarding a pending change, now might be a good time to dig one out of the trash and read it. Check System Preferences > Network, and Mail.app prefs
A helpful Apple Mail.app support page may be found here: Mail.
It's important to make the distinction between ISPs and ESPs: Internet Service Providers (ISPs) = Comcast, ATT, Cox, Hughes, Wildblue, etcetera; these are cable, phone, satellite and microwave companies. Email Service Providers (ESPs) = Yahoo, Google, Hotmail, et al. If you can't get online at all, it might be your ISP. If you can't get mail, it might be either. Try web mail: Launch a browser (Safari), go to ESP's server and login to your mail. That might narrow things down. If you're on a wireless network (AirPort/WiFi), your AP menu and/or Network pane in System Preferences should show name and status of your selected network. If it shows as connected, your Mac and router are communicating and the problem is somewhere between router, modem and ISP. If you use a laptop Mac, take it out on the town and try connecting to a different network at a restaurant or friend's house. If it works on another network but not at home, problem is not on your computer. Modems sometimes fail, as do routers, and most have lights indicating status. A damaged modem may report any number of odd (sometimes misleading) errors, it may endlessly try to connect or disconnect, its power supply may have failed, or your network prefs pane may insist that there is no device connected.
If none of this works, then either your ISP is temporarily offline - there might be a phone number on your bill to get a status report - or something more serious has changed that requires further evaluation. |
 Make sure all connections are intact and power is on. Sometimes it helps to power-up printers and peripherals _before_ starting up your computer. Check printer's ink tanks or cartridge. Look for any physical damage to the printer/scanner and its cables and ports. Make sure everything is properly connected. Unplug/replug cables.
Check settings and outputConsult your printer/scanner manual and try running printer's self-test to see if the printer itself is malfunctioning. This may be done with computer unplugged from printer. (Don't think scanners have a self-test.) Open System Preferences -> Printers and Scanners. Make sure your printer and/or scanner appears there and is selected. If not, its driver has gone missing or was never installed. Go online to manufacturer's web site, find the support page, and look for the driver appropriate to your printer or scanner model and your OS version. Download and install.
If printer is producing distorted output (too small, too large, sideways, missing fonts or styles), check and adjust Page Layout or Page Setup options in the app's File menu.
If output appears as a page of gibberish, or machine spews out blank pages along with the desired job, try printing something from a different application. Launch TextEdit, type something, and see if that prints properly. If so, the problem is app-specific and Print options need to be adjusted. Check driver and source
If you've recently upgraded your OS, you may need to download and install a new driver. (Same may be true of scanners.) Go online to manufacturer's web site, find their support page, and look for the driver appropriate to your printer/scanner model and your OS version.
If you are trying to print a page from some web site, know that web pages are not necessarily designed for printing and output might be spread over multiple pages or distorted in ways you wouldn't expect. There are workarounds for this - but don't blame your printer. Try printing a screen shot of the page. Check ink tanks or cartridge
We've seen aftermarket ink tank "refills" leak and damage printer's interior. If yours is an inkjet printer using third-party cartridges, you might want to remove the tanks and inspect these where they connect to printer.
It may be that your printer is simply worn out. If it's very old and on its last legs, don't waste any time trying to fix it - new printers are pretty cheap these days - probably cheaper than trying to make repairs. |
 Check and fine-tune your System Adjustments in System Preferences will frequently solve minor "problems" and may present options you were unaware of. Some commands show or hide controls, others produce shortcuts to apps and folders, and some turn various features on/off or change appearance of windows.
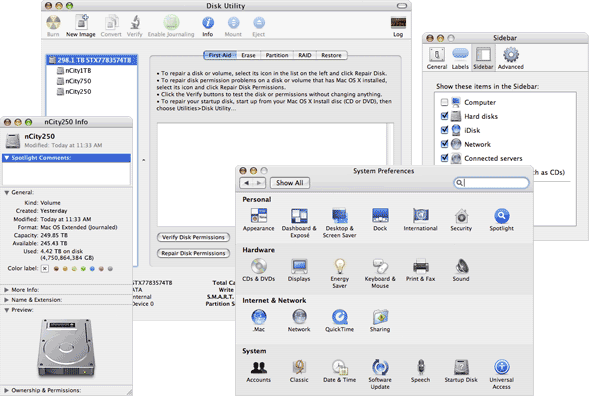 Clockwise from top: Disk Utility, Finder Prefs, System Prefs (pre-Ventura), drive Get Info window Disk Utility
Disk Utility (in Applications -> Utilities folder) is the only troubleshooting and maintenance app you need. Launch Disk Utility, click the First Aid tab and click Verify Disk at the first hint of trouble - or, just to make sure all is well.
Select drive identifier (in blue at top of left column in illustration above) and click Verify Drive button to check drive's format; this will be quick. Select the indented drive name below identifier ("nCity1TB" in illustration) and click Verify Drive button again to check drive's directory. This operation will take a few minutes, so be patient and wait until process is finished; best to quit all other apps and avoid interrupting Disk Utility. If any format or directory problem is present, Disk Utility will let you know and tell you how to fix it. If your DU version has a Repair Disk Permissions button, click that, too. Again, be patience, as this can take 5 minutes or more if it hasn't been done in awhile. (Newer OS versions have automated the permissions repair process, so there is no button.) Show items in Finder's sidebar Open Finder's Preferences (under Finder menu) and you will see four tabs as illustrated above: General, Labels, Sidebar and Advanced. General tab allows you to show/hide drive icons on your desktop, among other things. The Sidebar tab will show important folders in every Finder window sidebar; these should all be checked (on) by default IMHO, but they aren't, so have at it.
Experiment with settings under Labels and Advanced, too, if you like. Remember where these settings are in case you want to change Finder pref settings again later. Review System Preference settings 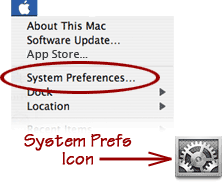
Your System Preferences (or Settings) control appearance and operation of your machine's Operating System across all apps. System Prefs are available from the Apple menu or from its icon in the Dock.
User accounts, date/time settings, desktop color/image and screen saver options, Dock settings, network settings (email and internet), printer, keyboard and mouse, startup disk and a host of other controls are located in System Prefs. Each of these controls can be changed and customized to suite each user; settings are specific to each user account.
While we're on the subject...
Many people think clicking a close button in a window's top-left corner (  ) is the same as quitting the application. It isn't. It merely closes the window (in most cases), leaving the application open, active and running. Why is this important? Because quitting unused applications frees up precious RAM. Instead of clicking the close box when finished with an application, choose Quit from the File menu, or type Command+Q. ) is the same as quitting the application. It isn't. It merely closes the window (in most cases), leaving the application open, active and running. Why is this important? Because quitting unused applications frees up precious RAM. Instead of clicking the close box when finished with an application, choose Quit from the File menu, or type Command+Q.Review App settings
Every program has its own set of Preferences/Settings that are specific to the program alone. These only affect the program and can make a difference in how it appears and/or operates. If there's something about an app you'd like tom change, check its settings.
Get info
Any and all files - every icon located anywhere in the Finder - has metadata attached describing file's kind, size, location, dates created and last modified, permissions, and all sorts of helpful information. Handy when trying to identify a file or sorting thru duplicates to see which is newer or bigger. Get Info can answer most questions you may have about a mystery file, including what apps will open it and which app created it.
|
 Run Disk Utility periodically Inside Applications -> Utilities folder is the Disk Utility application. Running Disk Utility to verify your hard drive and repair permissions can fix many minor errors before they become bigger issues.
PRAM Battery (aka "backup" or "clock" battery) If your desktop Mac is over 10-years-old, its internal battery may be getting weak. Symptoms on an iMac, Mini or tower include date/time error on startup, preference settings that may revert to defaults, and possible startup issues (extremely rare). Ancient Mac desktops used a 3.6v, half-AA-size lithium battery with a life of 5 to 7 years; newer Macs typically have a 3v BR2032 (or CR2032) button battery. These can last 10 years or more and seldom need attention.
Replacing a battery is easy for tower machines (Mac Pros), just make sure you pay attention to polarity. MacMinis are a bit more involved, requires some careful disassembly, and may be beyond a typical do-it-yourself job. iMacs require major disassembly, expertise and special tools to access the battery - it's typically located on the back side of logic board behind everything else. However, the need to replace a PRAM battery is all but non-existent and failures are very, very rare. Notebook Macs don't have PRAM batteries as such; they rely on machine's main battery to maintain settings (incl. date/time). Early laptops had a capacitor instead of a PRAM battery (back when swapping batteries was possible), but new notebooks don't even have - or need - capacitors. Fan noise and/or excessive heat Desktop or laptop, all computers have fans in them these days to help cool processors typically running at 140-150ºF. They all collect dust over time.
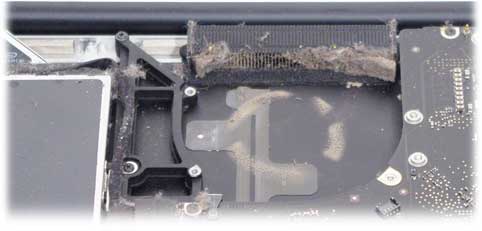 This photo shows where fan sits in a MacBook Pro and the dust it left behind. Fan's exhaust vent is almost completely blocked with a buildup of lint. Those little fins carry heat from machine's heatsink to the fan, but they also catch fuzz from blankets, pets and clothing that pass by. Whenever any machine gets serviced here at the shop - desktop, tower or laptop - we thoroughly clean fans, vents and interior because they all get dusty over time. A good cleaning can add years to a machine's life. In this case, the fan itself began to make noise and had to be replaced. They sometimes get so clogged and dirty a fan may stop spinning altogether.
All Macs have sensors within them to protect machine from overheating. You may get a warning - or not - but machine will throttle-back its CPU, put itself to sleep, and/or shut itself off if it senses an overtemp condition. In normal operation, fans are powered at startup and ramp-up as needed during use. They're usually so quiet you won't hear them, but when they go full-tilt they can sound like a drone. If your Mac is making noise, getting abnormally hot or fans are running at high-speed all the time, it may be due for a cleaning. Clear out browser cruft 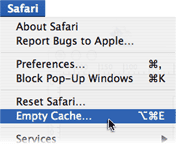
Older versions of Safari had a simple and convenient menu item that could empty Safari's cache (right), or clear out everything all at once - the Reset or Clear History command under the Safari menu . This clears cookies, history, cache, auto-fill text, and all the other junk (except bookmarks), aka "cruft." There is a second Clear History commend under History menu that only applies to History menu. Safari Prefs also has options to eliminate individual extensions and cookies.
Firefox and other browsers also allow you to clear cache, cookies, extensions and junk; these commands are typically found somewhere in browser preferences or under a Tools menu.
Clean out old emails 
We've seen mail apps so stuffed with old email - including folders full of trash and spam - that messages number in the tens of thousands. (Current record is over 120,000.) Nobody has time to sort thru all that. Clear out that inbox, delete all that spam, and empty the trash. Try to empty your inbox when you retrieve email by dealing with incoming messages as they arrive. Mail Preferences has settings that will automatically empty trash, spam and sent messages that are older than a day, a week or a month, as you prefer. Or, you can manually delete messages. Take the time to clean up and organize your email as you see fit - it will streamline use and make things easier to find.
Archive old email you wish to keep If you like, you can collect and export old emails from Mail to a TextEdit (rich text) file, which includes all photos, graphics and live links. Here's how:
First, select the messages you wish to save; the idea is to get them all into a single 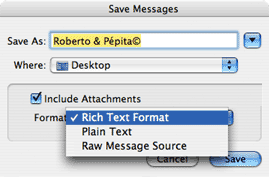 group, so you might want to create a Mail folder to contain them, then drag messages into that folder. group, so you might want to create a Mail folder to contain them, then drag messages into that folder. Arrange those messages by date, by name, subject or whatever order you want to keep them in; once exported, they will be end-to-end in one long file including attachments and addresses. Select all messages to archive by using Select All in Edit menu, typing Command+A, or by clicking the first one, scrolling down to the last one, then Shift-clicking the last message. With messages selected, choose "Save As..." in Mail's File menu. From the resulting dialog box (above) give the file a name, select a destination, and be sure to save in Rich Text Format, check the "Include Attachments" box to preserve images, links and attachments - all inline, with your messages - then click Save. Five easy reasons to clean up those files
|
 Startup problems. Startup issues are best handled by exploring easy
 solutions before moving on to more complicated ones. Start with status of the boot volume. If it's a notebook, has it been dropped or damaged? Will it boot from its Recovery partition? If so, does the main volume mount? solutions before moving on to more complicated ones. Start with status of the boot volume. If it's a notebook, has it been dropped or damaged? Will it boot from its Recovery partition? If so, does the main volume mount?Reading Symptoms: Simple as it may sound, failure on startup arrives in a variety of ways with a variety of symptoms (and clues). Try to answer these questions:
If you've checked all the usual suspects and machine still refuses to boot, try starting up from your Recovery partition (hold Command+R on startup) and see if you can run Disk Utility from Recovery. If so, try to make repairs.
Set Startup Disk in System PreferencesIf your startup volume is not specified in System Preferences, your Mac may take longer to startup as it searches all connected volumes. Check your Startup Disk setting and make sure the proper volume is selected.
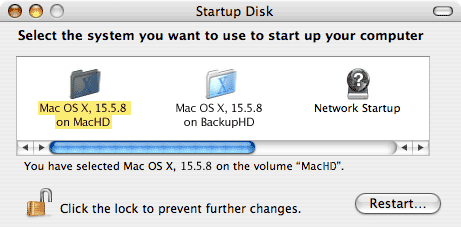 Select Startup disk in System Preferences
Pay special attention to the Operating System Even if Disk Utility passes all tests, various hardware tests pass, and all signs come up OK, that doesn't mean your Operating System is intact. A damaged OS can certainly prevent normal startup, but it might not produce any errors during diagnostics.
If your drive contains critical data, unique photos, or important files representing years of work, you do not want to risk losing it. Before doing anything drastic (like erasing/reformatting your drive, overwriting your OS with a new one, or any number of other ways to make matters worse), call for an appointment and bring it. If we can't recover your data, we will know fairly quickly - and we can recommend a recovery service that can. |
 The dreaded Kernel Panic (KP) With instructions to restart in four languages, the old Kernel Panic used to appear with a gray curtain descending over the screen and a black box with white text that was only lacking a skull and crossbones. If it appeared again after a restart, it usually meant something serious had gone wrong.
Newer OS versions don't even bother to present the KP message; instead, machine just automatically restarts itself. If restart solves the problem, great. If not, machine will be stuck in a startup/shutdown loop until someone holds down power button for 6+ seconds or pulls the plug. Before putting yourself (and your Mac) thru the trials listed below, you might save yourself the trouble and risk of making things worse by bringing the machine to our shop. Having said that, presented below - for information purposes only - are a few basic steps toward diagnosing possible causes of a Kernel Panic. What follows is a brief test using the Recovery partition that should be on your drive, starting with OS version 10.7 Lion. If your OS is older than that, more power to ya, but it's probably time for something a bit newer.
First, shut off computer and disconnect all attached devices. Then startup machine and see the KP has gone away. Yes = suspect external device, no = internal problem. Normal troubleshooting routines start by checking simple things first in search of a quick fix, but troubleshooting Kernel Panics is a little different. By eliminating connected hardware components, we are eliminating them as possible causes. They can be reconnected, one at a time, and tested individually if KP was solved without them. IMPORTANT: Do not attempt to make any sort of repairs or startup from any software older than your current Operating System. Newer versions might be okay, but anything older than your current OS is certain to fail (if you're lucky) or cause further damage (if you're not). KPs in general 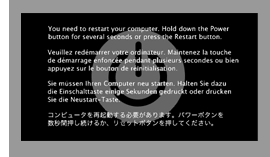 These can be indicative of both hardware and software problems, making them difficult to troubleshoot. Possible causes range from defective or failed memory (RAM) to damaged ports, connectors and peripherals. Failing or corrupt drives, failed or damaged video cards, everything from a damaged logic board to a corrupt font. Older OS versions produced the KP dialog box illustrated here, but newer versions aren't so kind - machine will likely just freeze, hang or stop responding to input.
If hardware is not the cause, other suspects include corrupt or damaged Operating System, firmware issues, device drivers, incompatible apps, even one or more corrupt fonts (rare). The list goes on and on.....
KP while running, versus KP on startup The timing of a KP's appearance can be a significant clue as to its cause. If KPs appear during the course of operation, it might be connected to use of a particular application, a specific OS component, device driver or peripheral. If so, uninstalling and/or reinstalling (or updating) the suspect software might return your machine to normal. If you're not sure about deleting things, don't. Just make a note of file's name and location.
If a KP happens on startup - on each and every startup or in a loop - the problem is probably more serious. It might still be a software issue of some nature, but more often than not it will turn out to be hardware related, possibly a drive failure.
Recent changes might suggest cause With so many potential causes, it might be helpful to recall events immediately preceding the appearance of a Kernel Panic. Recent changes or hardware/software installs may be the cause; KPs might not appear until your next startup, so go back to the last change that was made.
Run Apple Hardware Test Try booting from Apple Hardware Test (AHT) by holding down the "D" key at startup, or by using Startup Manager; select AHT and continue startup. With some OS versions, there is no AHT, so don't be surprised if "D" key is ignored.
Run AHT's Quick Test if possible. If the Quick Test turns up nothing, try the Extended Test. If no error is produced, you might try letting it loop a few times. AHT may uncover hardware issues, but it does not test software. If all tests pass without error, and all hardware is properly identified, that - sadly - does not mean everything is A-OK. We've had machines refuse to boot from anything except AHT - and pass all AHT tests anyway.
|