


|
Get it on video
Cameras are everywhere these days, as are cell phones, with ever-improving photo and video capabilities. The "best camera" is the one you happen to have on hand, so make it a good one. Phone cameras are excellent (and handy), but DashCams, HelmetCams, SecurityCams and even SpyCams capture video in ways a handheld might not. With a little ingenuity, these dedicated cameras can be automated to various degrees, too.
Image stabilization ActionCams and HelmetCams have a specific use, and should include image stabilization. (Newer cell phones may also have stabilization options.) A securely mounted cam is inherently stable, but body cams, handheld and helmet cams typically produce shaky video by the nature of their use.
Battery-powered 3-axis gimbals are available, if they suit your purpose, there are software solutions that make use of a camera's gyro data, and there's even an add-on gyroscope gizmo for around $100, but that's all professional gear - heavy, bulky and expensive.
Best solution might be in-camera Electronic Image Stabilization (EIS). EIS may use a large image sensor to cull a smaller, stabilized image, or use a process known as pixel binning where neighboring pixels are merged to reduce blur. Most cams have some degree of EIS, video editing apps may also have stabilization functions. Getting creative with camera mounts can go a long ways toward better video, too, and we're going to focus on getting best results from low-cost solutions.
As used here, minimum broadcast quality means 1080p (1920 by 1080) at 30 frames per second (fps). Technically, lowest acceptable is 720p, and of course 4K/60fps is much better, but file size and storage is another consideration and 1080p/30fps in H.264 format is something of a sweet spot for us rank amateurs.
Be aware that some cheapo cams advertise frame rates and specs that are bogus, and the market is saturated with these no-name devices. Cameras discussed below have proven to produce outstanding video in a tiny package making all sorts of applications possible. Sources listed on this page are known and verified, presented only for convenience; nCity is not affiliated with any manufacturer or vendor. There may be some new gems out there we're unaware of, too. Links are at bottom of this page.
Getting started It helps to be familiar with editing software and to settle on specs and requirements that suit your purpose. For example, file size (determined by image size, resolution, frame rate and file format) will dictate storage requirements. If you've shot any video at all, you know how large video files can be. Cards used are typically micro-SD class 10 or better.
PROCEED AT YOUR OWN RISK!
Jump down page to:
Camera considerations, types, lenses + more
CCD and CMOS sensors
Infrared-Cut filters (IR-cut or "hot mirror" filters) Remote Control and Automation File types, editing and playback |

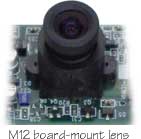
ActionCams, SecurityCams and lens options The majority of both action and security cameras share a common lens type known as M12. ActionCams typically use wide-angle version, while SecurityCams tend to have a more focused or close-up Field Of View (FOV). Image distortion can be considerable over 100º (most ActionCams), and a FOV below
 30º might be too tight, depending on objective. Somewhere between 40º and 60º may be considered "normal," 70º to 85º is an acceptable wide-angle compromise, and there are other ways to minimize fisheye via programming in some cameras. 30º might be too tight, depending on objective. Somewhere between 40º and 60º may be considered "normal," 70º to 85º is an acceptable wide-angle compromise, and there are other ways to minimize fisheye via programming in some cameras. Why care about FOV and various lenses? If your goal is to cram maximum information or FOV into the frame, a wide-angle lens is the only way to go, which is why fisheye has become ubiquitous as the hallmark of ActionCam video. If you're happy with your camera's lens (saving yourself much of what follows), stick with it. Read on for mounts, power and other mods you might find useful. If you prefer a "normal" FOV with minimum distortion and better focus on your target, you may find lens options available in your camera of choice. |
 Field of view (FOV) and focal length for M12 lenses ©2013 nCity |
It's important to note that sensor size will affect FOV and image quality, as does the chip set used, lens response time and firmware running the camera. Sensors, chip sets, lenses and cameras have all improved a great deal in recent years and will continue to improve as time goes on.
 The three (reduced) stills above are from three old Drift cams shown below, all mounted together to demonstrate FOV difference between lenses. Distance from cameras to motorcycle was about 20 yards (60 feet).
 Top still is from the Drift's OEM 2.5mm lens. Unwanted inclusion of objects surrounding camera may become a problem when mounting a cam. Unless placed at extreme front or rear of vehicle, a large portion of frame will be consumed by dashboard, fenders, handlebars, helmet, or other things that may detract from shot (using tripod here). 2nd still accurately shows target and frames clouds nicely while cropping out distractions and presenting more-or-less what the eye sees with a 51º field of view. 6mm lens is good choice for general-purpose video. Bottom still from 8mm lens begins to enlarge target and is well suited for relatively distortion-free shots of a specific target. Targets within about 20 feet or so will fill frame, making it perfect for filming nearby riders or vehicles. You may notice a slightly different color balance in the bottom shot; this is a function of the IR-cut filter. The weaker the filter, the less color saturation it produces as infrared begins to overwhelm other frequencies. Using a strong IR-cut filter (which is usually mounted to base of lens) will produce vibrant color, noticeably absent in bottom image.
|
 The BFD about CCD and CMOS The BFD about CCD and CMOSHow complicated can it be, right? Plenty. Read all about it if you like, but here's the short version:
CCD (Charge-Coupled Device) was an analog standard, sharp and smooth, commonly used in security cams and CCTV systems. CMOS (Complimentary Metal-Oxide-Semiconductor, aka "sea-moss") is digital, fast, easy, and low-power, used in mobile devices and computers. Okay, let's be honest: Analog video doesn't stutter, it doesn't stall or drop frames or make chunky exposure/color adjustments on the fly. But we're dealing with _digital_ video here that can do all those things, and the objective is to avoid 'em in pursuit of the one concern that is critical to both types: Image quality (resolution, color balance, exposure, and playback).
Cameras may use either CCD or CMOS sensors with identical lenses and IR-cut filters to produce digital video output, so while it's helpful to know which sensor/lens/filter combo your camera of choice uses, sensor type really doesn't matter much if output is acceptable. Both types are equally sensitive to infrared wavelengths, BTW.  Micro pinhole lens assembly (left), and a typical M12 lens |
|
Infrared (IR-cut) filters Most cameras have IR filters built-in for daytime use, but bare lenses will probably not include any filters. As it turns out, getting a good IR-cut filter can be the most difficult part of changing a lens, and mounting a filter can be tricky. IR-cut filters typically consist of a delicate coating on a small piece of glass positioned between sensor and lens, and the quality of this filter has everything to do with color balance. Digital video shot without an IR-cut filter (or with a poor one) will appear slightly fuzzy and washed-out. Not good.
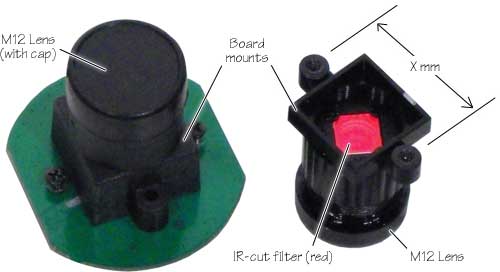 Two types of M12 lens mounts are shown above, one upside-down showing its IR filter attached to end of lens. Critical dimensions for board mounts are the distance between centers of mounting screws (X mm = 18mm, 20mm, 22mm, etc.), and the depth of "box" covering sensor and filter. Left lens has a deep box; lens on right has a very shallow box. Some mounts use a locking ring or spring tension to fix lens to mount, some have a set screw, but many are simply glued together. Depth of box determines distance to sensor. Focus is achieved by screwing lens in/out of mount (more on that later), but any contact between lens and sensor will likely damage both, so beware and make sure there is room and means to install IR-cut filter if necessary. |
|
Remote control and/or automation Cameras with remote controls are becoming common for good reason. A wireless remote eliminates having to grope for controls and allows easy start/stop without risking change in focus or direction by handling camera.
Multiple mounted cams may all be activated simultaneously by a single remote, too, provided they've all been paired and setup. This function is important enough to be considered critical in some situations (while driving for example), and can be thought of as in-camera editing saving a lot of time later. Cams with a standby mode often have decent battery life, lasting 4-8 hours or more. An alternative to remote control is programmed automation.
Programmable cameras may be set to record nonstop, re-recording over previous video in a continuous loop. Cameras with loop functions in their programming are commonly sold as dash-cams or "black-box" cameras and operate much like a so-called black-box in an aircraft. A physical shock or save button will lock current clip to prevent it being overwritten as camera continues to record. Autosave options are entirely a function of camera's programming, and options vary between brands. Otherwise, a non-stop loop may be used to capture everything, but be prepared for reviewing hours of video. Many cameras will have firmware updates from time-to-time, depending on manufacturer. Some use a computer file that may be modified and adjusted before loading into camera, where it becomes camera's configuration file (or "script"). Notable among these is the Mobius Maxi. Being about the size of a Zippo lighter allows Mobius cams to serve in ways that bigger, bulkier, and heavier cameras cannot. More on the Mobius below.... |
|
File type and editing: Resolution, playback, size and apps H.264 codec is best choice for editing purposes, thanks to its video quality and compression. Also known as .MOV or MPEG-4, H.264 is supported by most computers, handheld devices, web browsers and editing software, H.264 should be considered a requirement for any camera you may choose. AVI will work, but having to convert video between formats is an extra step that's best avoided. Video codec also determines storage requirements, and H.264 can cut file size by 50% or more over other file formats.
As for resolution and frame rate, 720p at 30fps is considered minimum broadcast quality. 1080p is better, as is 60fps, and these settings can be mixed down for posting. 4K and above is overkill (IMHO), and not worth the extra burdens of storage and editing requirements. You may prefer to shoot at higher quality settings, but we're talking about 1GB/min. in some cases; depending on number of cams, edited versions, format and software, storage requirements can escalate quickly. (720p = 1280 x 720 pixels, 1080p = 1920 x 1080. Both are wide-format 16:9 aspect ratio.) At the very bottom of video quality is QVGA (320 x 240), followed by almost acceptable VGA (640 x 480), both in 4:3 aspect ratio. These might be considered "home movie" territory. If your goal is web video, there's nothing wrong with shooting in VGA, tho aspect ratio may look a bit dated and image quality will suffer a bit. Once recorded it's impossible to improve video quality later, so - again - you may want to shoot higher quality and post reduced versions on the 'net.  Editing video is a topic worthy of the many books and manuals written on the subject, and software options are legion, running from free (and easy) to hundreds of dollars. Final Cut Pro, Adobe Premier, Avid Composer are all high-end, top-notch apps, but there are some low-cost and free gems out there, too, starting with everybody's favorite iMovie. Windows users have Movie Maker for Windows 10 or later. Search "video editing software" for countless choices, but you're certainly going to need _something_ to edit your masterpiece.  As with everything these days, you get what you pay for (mostly), and free or light-weight video editing apps lack the pizazz of pro apps. Common considerations include aspect ratio, resolution, frame and format (file-type), multi-cam support, audio editing, transitions, special effects and many other capabilities that may be desirable. Pro editing apps like Final Cut and Adobe Premier are sophisticated enough to handle just about anything, but these come with a learning curve that requires a serious commitment. Any editing beyond the most basic will also require dedicated hard drive space and backup drives. |

|
Camera power supplies and options Primary modus operandi here is typical for ActionCams, which are usually battery-powered and charged via USB. Record what you like, when you like, in short clips, with manual control depending on mounting options; HelmetCam, BodyCam, handheld, etc.
 If hard-wired to vehicle 12vdc is the plan (DashCam or TailCam), a USB adapter is the obvious choice, like the 12v to 5v USB N117 Buck converter shown here with USB output port from 12v input (more on the N117 below). If hard-wired to vehicle 12vdc is the plan (DashCam or TailCam), a USB adapter is the obvious choice, like the 12v to 5v USB N117 Buck converter shown here with USB output port from 12v input (more on the N117 below).USB power ports are provided in most vehicles these days, and can recharge cam batteries or be used directly as a power source. Hard-wired or battery power, each has specific advantages and drawbacks.
 Needing a battery tender for winter, I found a nice one with this bullet connector and cap. Wired up to battery lugs, this connector is concealed behind motorcycle side cover where connecting the battery tender is convenient. Happened to be right next to saddlebags, so I built a 12v adapter for use as USB/12v battery and device charger while on the road. Needing a battery tender for winter, I found a nice one with this bullet connector and cap. Wired up to battery lugs, this connector is concealed behind motorcycle side cover where connecting the battery tender is convenient. Happened to be right next to saddlebags, so I built a 12v adapter for use as USB/12v battery and device charger while on the road.Pictured to right is a dual-port USB adapter, about the size of a cassette tape,  which also has two 12v-out jacks if needed. Each USB port is rated at 3000mA (3 amp) @ 5vdc, plenty of power for charging most any USB-powered gizmo. Adapter uses a pair of N117 Buck converters equipped with the same bullet connector/cable as the one used for battery tender (both pictured above). Adapter is mounted inside saddlebag where it is out of the way and easily accessible to charge cameras, batteries, GPS or phone while riding. which also has two 12v-out jacks if needed. Each USB port is rated at 3000mA (3 amp) @ 5vdc, plenty of power for charging most any USB-powered gizmo. Adapter uses a pair of N117 Buck converters equipped with the same bullet connector/cable as the one used for battery tender (both pictured above). Adapter is mounted inside saddlebag where it is out of the way and easily accessible to charge cameras, batteries, GPS or phone while riding. The Wasabi charger (pictured at left) came with a pair of batteries for my hand-held video camera; these chargers are available for just about any type of camera (from Amazon vendor Blue Nook, link at bottom). Both the Wasabi batteries and chargers are top-notch and well made. Chargers have retractable 120vAC plugs and 12vdc in for mobile use (arrow). Great for recharging specific models of handheld cameras and various battery types. The Wasabi charger (pictured at left) came with a pair of batteries for my hand-held video camera; these chargers are available for just about any type of camera (from Amazon vendor Blue Nook, link at bottom). Both the Wasabi batteries and chargers are top-notch and well made. Chargers have retractable 120vAC plugs and 12vdc in for mobile use (arrow). Great for recharging specific models of handheld cameras and various battery types.A hard-wired DashCam that continuously loops over previous recordings will catch everything that happens from vehicle ignition on to ignition off. Do the math and you should find a 32GB SD card gives you plenty of recording time (64GB for dual front/rear DashCams), especially if you use the shock/lock feature to retain clips while it continues to loop. Some have motion-detect, and time-lapse options as well. A DashCam is the way to go if you only have one camera, guaranteed to capture any surprises while driving. Handy for insurance claims, too. All of the cameras discussed here use rechargeable batteries. Some handhelds have
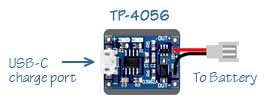
 removable batteries that are placed in a charger, others have internal batteries that charge by connecting camera to USB power. In the case of a DashCam application, using capacitors is recommended in place of a battery due to operating temperatures and the fact that camera is usually hard-wired to a power source and operated with vehicle ignition. removable batteries that are placed in a charger, others have internal batteries that charge by connecting camera to USB power. In the case of a DashCam application, using capacitors is recommended in place of a battery due to operating temperatures and the fact that camera is usually hard-wired to a power source and operated with vehicle ignition.The Mobius internal battery and optional capacitors shown above (four super capacitors wired in series) both serve to activate camera when powered on and save last recorded file when powered off. Both charge when connected to  external power, typically 5v from a USB power source or computer. external power, typically 5v from a USB power source or computer.Shown at left and below is a rechargeable battery in a camera equipped with its own battery management board, matched with battery to safely maintain and charge lithium-ion batteries. In this case, we have a 1000mAh (1A) lipo battery connected to a TP-4056 battery management board providing charge functions.   Hard-wired DashCam, or battery-powered and portable ActionCam? Tough choice. Why not do both? 8^) |

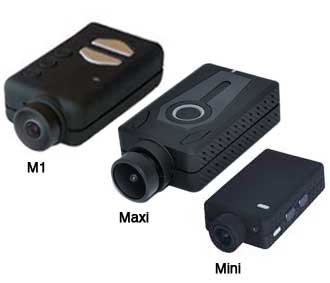 Mobius Maxi and Mini These tiny video cameras are nothing short of spectacular. They have evolved and improved over the years, from the first Mobius model (M1) to the much improved Mobius Maxi and it's little cousin the Mobius Mini.
Three M1s have served in a variety of motorcycle roles for many years - a hard-wired DashCam, external-battery TailCam, as a HelmetCam and a portable BarCam. They've survived multiple trips across the desert, thru mountain passes and along the coast without so much as a dropped frame. The Mobius Maxi and Mini models replaced my old M1s long ago. With improved lenses, chipset, recording time and vastly improved video quality, I switched to 1080p/30fps, tho the Maxi is capable of more. The Mini has its own set of specs: 1920x1440 or 1080p @ 30/60fps, 720p up to 120fps, and VGA up to 240fps. (The high fps settings produce slow motion.) All Mobius cams may be ordered with their "standard" (A) lens or a wide-angle (B) lens and they have a variety of options designed for use on drones and RC vehicles, or for use as DashCams, SecurityCams, SpyCams or most any other use you can think of. FOV is adjustable via programming (wide or narrow) along with a variety of other settings and options. They even have wireless capability. Manufacturer has included many features designed for those of us who like to modify these things, with the understanding that their product will most likely suffer such a fate (as all of mine have). For around $100, audio/video quality is every bit as good as $200-300+ cameras. Links posted at bottom of this page go to the Mobius Action Cam site and a few support pages dealing with these cams. If 4K video is more to your liking, Mobius has the MM4K which is about the same size and configuration as the original Maxi; it's almost identical.
 Mobius Maxi MM4K
This camera has the same battery/capacitor options, same programming, same features and functions as the Maxi that preceded it - only in 4K.
Teardown:
Two tiny screws allow case to be opened and top removed. Lens is attached to printed circuit board (PCB) by a ZIF-connected ribbon cable. Internal battery unplugs, lens lifts out, 3-4 screws removes PCB from case. Lens Replacement:
Lens holder is a standard M-12 mount with a set screw in the old M1 model; I've changed out lens in favor of longer 6mm, 8mm and 12mm lenses with no difficulty, using WebCam mode to adjust and set lens focus. The Maxi, with its programmable FOV, pretty much eliminates need to swap lenses - and video is so fast and smooth that it's difficult improve upon. Format and file types: All these cameras are capable of formatting their own SD cards, up to 128GB in the Maxi and 64GB in Mini (class 10 or better). Videos are H.264 MOV (best), MP4 or AVI. Image may be flipped, FOV adjusted, lighting options, frame rates, and other settings adjusted via programming on computer Programming Mobius cams
Mobius provides a programming utility created in conjunction with state-side Mobius fans, but it's merely a graphical interface and is really unnecessary. Camera's script can be dumped onto cam's SD card, then edited on computer with any text editor app (TextEdit on a Mac). Script is a straight-forward line-item list of settings and options, set on/off by putting a 1 or 0 in the brackets next to each function. Multiple choice options are numbered; some settings, like exposure and color balance, require a numeric value but default settings are best in most cases. Simple. Once adjusted, script loads back into camera via SD card. Mobius recommends formatting SD cards within the camera, which is best, but Apple's Disk Utility may also be used with these settings:  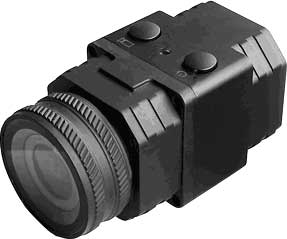 Mobius SLL1 underwater cam
The SLL1 has almost nothing in common with the Mobius cams above, other than similar programming via script loaded onto SD card. Roughly the same length as the Maxi, it's almost 3x as tall, with a solid metal case. Surprisingly heavy and stout, it might be a good choice for underwater video, having been designed to be completely waterproof, but it's of little use to me. It's only controls are the two buttons on top; on/off and mode select (it has two modes, as do all Mobius cams). Advertised as a low-light cam, it's something of an oddity in the Mobius lineup.
Test results here were disappointing. Its 150-degree wide-angle lens produces substantial fisheye, its low-light capabilities may be better than other cams - hard to tell - and audio from mic buried deep in case is problematic. If waterproof is important, this might be a good choice.
Always use quality name-brand SD cards from a known vendor; many - if not most - recording issues can be traced to media failure, corrupt/improper format or an SD card that's not up to Class 10 specs.
No shortage of counterfeit memory cards, flash drives and solid-state storage devices these days, especially on Amazon. If the price seems too good to be true, it probably is. In addition to using name-brand cards, only buy from a legitimate source.
|

 Mobius Mini TailCam Mod
Simple: A few cuts to modify case, cut a circle out of top cover (right), and lens can be angled up to 15º relative to camera body. (Yellow plastic strip protects thermal pad during mods.)
 Once case mods are complete, lens sits nicely in remaining guides with ZIF ribbon cable delicately reshaped to eliminate any stress. With battery in place, top cover secures lens in its new position aided by fitting a lens hood. Back of camera mounts to  an aluminum bracket that acts as a heatsink while securing cam, tucked in between sissy bar and passenger back rest. Lens was placed at a very specific 75º for this application and lens hood reduces glare from chrome and sunlight. Bracket also holds on/off switch and connection to an external battery (more about external power below). Only the TailCam's lens peeks out from backrest, camera is nearly invisible. an aluminum bracket that acts as a heatsink while securing cam, tucked in between sissy bar and passenger back rest. Lens was placed at a very specific 75º for this application and lens hood reduces glare from chrome and sunlight. Bracket also holds on/off switch and connection to an external battery (more about external power below). Only the TailCam's lens peeks out from backrest, camera is nearly invisible.Mobius Mini BarCam (BodyCam)
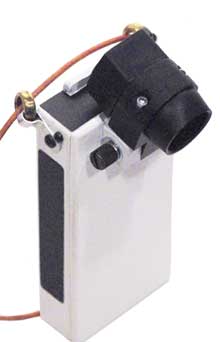
 Photo at left is another specialty mod of the Mobius Mini. This one has lens angled to its maximum 15º down angle, specifically designed for motorcycle use. Photo at left is another specialty mod of the Mobius Mini. This one has lens angled to its maximum 15º down angle, specifically designed for motorcycle use.Mini cam was mounted to the aluminum housing of a cell phone power bank (that dwarfs camera) providing both a heat sink and 5,000mAh of power. Glove-friendly rocker switch starts and stops recording (using external power setting in Mobius program), lens angle is precisely fixed to keep video centered and level, and is secured by lens hood. Camera hangs from chain around neck while riding. Calculations from real-time tests on this camera indicate a full 8-hours of recording time per 32GB (class 10) SD card with video set to 1080p @ 30fps, 20 minutes of video = 4GB. Using a 64GB SD card (camera's max at the time) it can record for 16 hours to a single SD card. Battery will go for days before needing a charge. 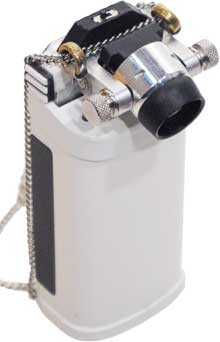 Mobius Maxi BarCam v4
Next version BarCam used a Maxi camera board and lens, and sports some major improvements over 1st BarCam above.
With Maxi's bigger and faster lens on a swivel, unit is powered by a 2500mAh battery behind four SuperCaps ensuring proper end-of-file and shutdown.
Independent charge and operating circuits extend battery life while adding recording time. Charge circuit uses a 4056 board while operating circuit has its own step-up buck converter providing 1A at 5v from internal 3.7v lithium battery.
Easy to find (glove-friendly) on/off slide switch at very top of unit, charge/run switch on back for recharging battery. Unit is heavy enough to resist wind at highway speeds.
Like its predecessors, camera is suspended on a chain worn around the neck. Brass loops support camera from chain and allows active head movement while riding without disturbing camera position
 Mobius Maxi BarCam v5
V5 (and last) BarCam uses same 2500mAh battery without additional charge circuitry V4 had, making it much slimmer and lighter. Machined aluminum lens mount replaced by plastic version with stop at precise 20º down angle designed to wear while riding.
(Why "BarCam" and not BodyCam? Mainly because handlebars are always in bottom of shot of road ahead.)
Test with fully-charged battery produced over 5 hours of continuous 1080p video in 112 3-minute clips for just over 38GB on micro SD card. With added heatsink and thermal paste, unit reached an acceptable max temp of 95ºF two hours into test.
A surprise from test results was a clicking sound from chain links traveling thru brass support rings - don't recall this from the V4, but mic is usually overwhelmed by wind noise anyway. Any audio I used while riding was from TailCam. Replaced chain with leather, problem solved.
Rather than building charge circuit
 into camera, the 4056 board is now in its own travel case. Carrying a spare 2500mAh battery means 10 hours of recording time with a (no tools) battery swap. While the Mobius Maxi includes its own charge circuit, I don't want to stress it with a huge battery, tho it probably would be okay. Original Mobius battery was 820mAh. Doing a battery swap is faster than waiting for battery to charge anyway. into camera, the 4056 board is now in its own travel case. Carrying a spare 2500mAh battery means 10 hours of recording time with a (no tools) battery swap. While the Mobius Maxi includes its own charge circuit, I don't want to stress it with a huge battery, tho it probably would be okay. Original Mobius battery was 820mAh. Doing a battery swap is faster than waiting for battery to charge anyway. Mobius Maxi as DashCam
Pictured near the top of this (too-long) diatribe just after the Mobius Mini, the Mobius Maxi is a stout and stellar performer, limited only by the maximum size of its micro-SD card (128GB). Using our formula for 1080p/30 at 4GB per 20-minutes, that's 640 minutes or 10.6 hours recording time per card.
Used as a DashCam, it can be set to loop - or not - and will save/lock select clips manually or automatically via its G-sensor. It has a host of other features and options, and has served as a hard-wired DashCam on the bike for over 10 years. Bike's DashCam is mounted inside a protective leather case behind a crystal  lens and is clamped direct to handlebars - no modifications beyond mount and power source. lens and is clamped direct to handlebars - no modifications beyond mount and power source.Camera is connected to an unused 12v circuit within headlight bucket, activated by ignition switch, and uses the N117 Buck converter to step down from 12v to 5v USB (right), also stashed within headlight bucket. Had some teething problems with the Maxi early on, but once sorted, the Maxi has been nothing short of awesome, and no less remarkable given its price point. You can get four of these for less than a single GoPro without compromising video quality or features - and all four together are less than half the size of a GoPro. The Mobius Maxi has become my favorite cam by far, for all the right reasons. Currently have six of 'em, and might have to spring for the new 4K model (tho I'd still be shooting 1080p). |

|
Drift HD 720 Camera - old model - teardown & mods ADDENDUM: Drift cams haven't changed a whole lot since this teardown; unknown if any of this applies to the new Ghost XL and XL Pro models, but it might. They look the same - just more expensive.
Objective here was to replace cam's wide-angle 130º lens with a "normal" lens, in this case a 6mm/50º lens with new mount and IR-cut filter. (Changing lenses means replacing lens, mount and filter as a unit because original assembly cannot be taken apart or modified. If you try, you're likely to destroy all three.) Disassembly begins with removing back cover, battery and SD card. Remove four 1.5mm hex screws and lens cover. Flip camera upside-down and remove six long  phillips screws from bottom-half of camera case. phillips screws from bottom-half of camera case.Lift bottom case straight up, pull speaker loose from case (if necessary), set bottom case aside. Note spring-loaded battery eject mechanism and location of antenna wire. Remove eject spring and arm (to avoid losing 'em). Loosen rubber seal from rear of case and peel it forward toward lens, popping mic out of its rubber mount (see below). Holding seal toward lens, free antenna wire, then move battery box aside exposing circuit boards and lens assembly. Next step is the delicate process of releasing ZIF connector and removing internals from top case. (If you're only replacing lens, you might be able to skip this step and work with only bottom case removed.) ZIF release is a brown tab that _slides_ about 1/16" away from connector toward case wall. Remove screws from circuit board, then free circuit board assembly from top case by lifting lens end first. Ribbon cable should slide out of ZIF connector. Set top case aside.  Mark sensor board and corresponding side of lens mount for reference on reassembly; bear in mind that lens is upright when camera's display is on RH side and lens housing is aligned with case. In a dust-free environment, remove four screws between sensor board and lens mount while holding all firmly in place to avoid damaging sensor. Two screws fasten board to mount, the other two pass thru to lens housing. Remove lens+mount from housing/seal by pressing lens rearward (press fit). Store original lens/mount assembly in a sealed bag in case you might want to return cam to its original configuration - resist temptation of removing lens from mount. Replacement mount with a proper IR-cut filter may be 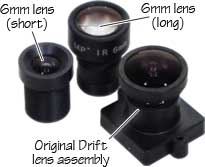 obtained from B&H Photo in New York (SKU = MAVLH4IR, security lens holder w/FBG28 filter, link below). New M12 mount will need to be filed down slightly on all four sides, but will then fit into Drift's rotating housing perfectly. And the IR-cut filter from B&H is excellent. obtained from B&H Photo in New York (SKU = MAVLH4IR, security lens holder w/FBG28 filter, link below). New M12 mount will need to be filed down slightly on all four sides, but will then fit into Drift's rotating housing perfectly. And the IR-cut filter from B&H is excellent.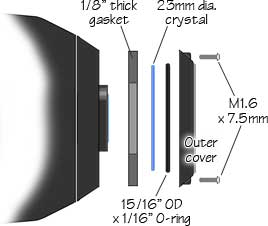 Lens must be a SHORT one to accommodate the Drift's lens cover. The two 6mm lenses shown here are both megapixel models with nearly identical optical specs, but the long one (22.5mm in length) will not fit behind lens cover when focused. The shorter model fits, but there's another problem: Drift's convex lens cover prevents sharp focus with normal lenses. So, we added a gasket cut from 1/8"-thick neoprene rubber and used a flat glass crystal. We also added a thinner O-ring to replace the Drift's seal.
Focus and fine tune before reassembly NOTE: If you haven't removed the battery eject spring and arm, now is a good time. Once eject has been removed, insert a battery and SD card, power up and install lens. Focusing this cam is a bit more difficult than those with HDMI output that can be focused on a large screen. We used an Air Force test target with the Drift's display as a starting point, then shot test video using index marks to fine-tune camera focus. 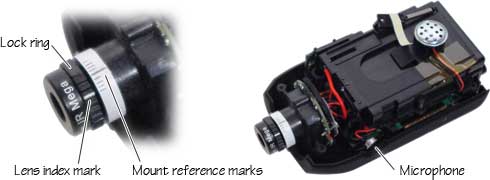 Microphone breakout Removed the Drift's mic, soldered it to a short stereo cable with a 2.5mm plug (ignoring center connector) and reinforced connection with some stiff shrinkwrap. Mic was placed into a very soft, hollow silicone grommet - just like Vivitar mic above - to further deaden any vibration and give the mic a little more mass.  Muff is made from a circle of sheepskin about the size of a silver dollar with a tiny hole punched thru leather at mic, then drawn tight with a stitch around perimeter. Foam muffs are available, or foam tips from earphones might work, too.
 The original Drift microphone mount has a hard plastic T-shaped spacer within its rubber socket; inside diameter is perfect for 2.5mm jack, using the smallest, round, panel-mount jack available. Jack's switch contact was carefully cut off - snug fit inside rubber mic socket - and that T-shaped spacer had to be shortened a bit to allow plug to seat properly. Naturally, the thin rubber mic cover had to be pierced, which may compromise the Drift's weatherproof seal but useful audio without wind noise is absolutely worth it. The original Drift microphone mount has a hard plastic T-shaped spacer within its rubber socket; inside diameter is perfect for 2.5mm jack, using the smallest, round, panel-mount jack available. Jack's switch contact was carefully cut off - snug fit inside rubber mic socket - and that T-shaped spacer had to be shortened a bit to allow plug to seat properly. Naturally, the thin rubber mic cover had to be pierced, which may compromise the Drift's weatherproof seal but useful audio without wind noise is absolutely worth it. This 6mm cam was used in FOV demonstration at top of this page, along with a stock wide-angle 2.5mm Drift and a third Drift with 8mm lens installed. |

|
SJ Cam model C110
 I really wanted to like this camera.... I really wanted to like this camera....
Compact, surprisingly heavy, it comes with a great underwater housing and a full assortment of solid mounts. Connects via WiFi to your phone, has all the features you want, and it uses H.264 codec. What's not to like?
For starters, turning it on requires a minimum 5-second press of power button. Startup takes a moment, too, then it plays a tone to indicate it's recording. Video has a full 1-second delay of output to phone. Mic is located on top and doesn't pick up much from anywhere other than above. It has an enormous blue LED across full width of front (that, fortunately, can be turned off). All minor complaints, but the deal-killer has to do with its primary feature: "Connectivity."
Connecting to WiFi is troublesome and iffy; plus, it requires setting up a new network and turning off existing WiFi network. Location services must be on. Why? Worst of all, settings and controls are accessed from phone, making any adjustment or change a royal PITA. If it had a computer app for controls I could (almost) live with it - but there isn't one. Too bad.....
GitUp F1 Helmet Cam (Sadly, now extinct)
The GitUp F1 produces outstanding audio and video (aside from wind noise), but its greatest asset is image stabilization at 1080p. Helmet cams are almost useless without stabilization, and the F! does a very good job.
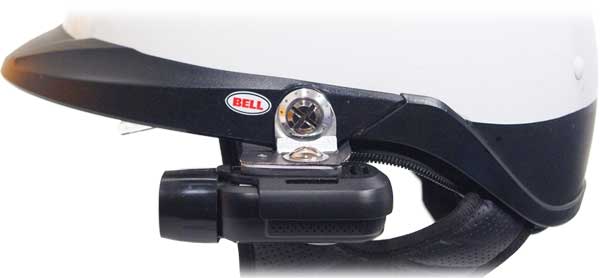 Zoom function takes helmet out of the shot while enlarging focus on target. It also has an optional wireless control, but large start/stop button on top of camera body is easier to use when mounted (upside-down) on helmet. Flip function compensates for inverted mount. Only complaint I have with the F1 is the file format it records in, but converting format is a small price to pay for camera's image quality and stabilization.
CamStick and the L01 cam
 I had at least two different brands of "CamSticks" that were nearly identical with the same design and concept. One was called the L-zero-one and the other had the more descriptive name I'm using here, CamStick. I had at least two different brands of "CamSticks" that were nearly identical with the same design and concept. One was called the L-zero-one and the other had the more descriptive name I'm using here, CamStick. Both shoot 1080p, both produced very good video and audio, and both are solid BodyCams. One had a bigger battery than the other, but that was about the only difference between the two of them.
For my purposes, tho, as a BarCam on the motorcycle, both of these cameras had the same two "issues" that made them both unsuitable, tho in the real world both are actually assets: The lens swivel didn't rotate far enough when seated against backrest, and both were too light to withstand wind.
 Internals were also nearly identical, aside from difference in battery; one had an internal magnet taking up space occupied by battery in the other. Internals were also nearly identical, aside from difference in battery; one had an internal magnet taking up space occupied by battery in the other.Lens cable wrapped around a spool allowing for movement, the same bulletproof arrangement and ribbon cable used by early notebook computers.
Unfortunately, the ribbon cable simply wasn't long enough to allow the angle needed for a BarCam. Otherwise the magnet model might've served well, except for its light weight and narrow, rounded shape.
Both were great cameras and an excellent choice for more normal use by normal people.
Micro DV NecklaceCam Model V9
 This tiny wonder - shown actual size, about 1.75" square - shoots 720p or 1080p with a fast 120º lens. Has motion detect, optional time stamp, records excellent audio and includes settings designed to maximize runtime. Display is full color, sharp and clear. Charge and output thru USB-C port on bottom.
Testing this impressive little guy at 1080p 30fps with audio, it ran for 2hrs 20min from a 530mAh battery using AVI format. 50min video = about 8GB on 24GB internal storage. These were available with 8GB up to 128GB internal storage options, priced accordingly.
Controls include start/stop and audio on/off (big buttons on top), menu and power buttons on sides. Wear as a necklace or use included clip-on mount. Dunno if they're still available - this one came from eBay.
The 808 family of Keychain Cams:
Last but not least is a wide variety of tiny HD cameras loosely known as 808 cams from Hetai in China, latest iteration being model #18. The camera that started it all was a tiny keychain cam that shot such remarkable video it quickly became popular with hobbyists of all kinds, mounted on drones, model aircraft, boats, cars and even pets. It has since gone thru dozens of revisions and improvements, morphed into pen cams, lapel cams, and more. Point is, these folks are serious, and their cameras come in about any configuration you can think of. Hidden in smoke detectors and alarm clocks, they shoot such excellent video and are so cheap they're extremely popular as nanny cams and spy cams. Some people probably still carry them on keychains, but I'm guessing smart phones are the new go-to for video.
Internals of an early 808 cam:
 Original 808 keychain cam (shown actual size). Micro SD card slot has card installed, USB port, microphone in upper-left, lens on left, rechargeable battery on right.
These cameras are still available via select vendors on eBay, and some are also sold thru retailers, but beware of countless fakes out there and only deal with recommended vendors. See links at bottom of page. |

 Most ActionCams come with a variety of plastic mounts, typically handlebar and helmet mounts. Specialized mounts are available for specific applications, even watertight housings. Not difficult to make one, especially if cam accepts a standard 1/4x20 mount screw.
Ugliest mount, top-left above, is an anodized aluminum clamp designed for versatility with a ball-mount at camera and a set of jaws that will grab onto just about anything. This one-size-fits-all solution is handy for special shots but not as a permanent mount.
Middle-top is a rather awkward handlebar mount, then a typical suction-cup windshield mount (that I wouldn't trust for more than a few minutes), and in the center is a two-part scheme where one piece threads into camera then clips into actual mount, a concave helmet mount or other fixed mount.
My favs are the stainless steel clamps along bottom; found at a marine store on eBay and modified, they are as short and stout as can be. One has a swivel head from a $5 tripod, the others are handlebar mounts, including a modified "P" clamp in use for years as motorcycle DashCam.
In addition to mounted Dash and Tail cams, I carry the kit below with an extra cam (a Mobius Maxi with SuperCaps), two versatile mounts, cables (in bag), power supply and a remote switch:
 Clockwise from left: Start/stop switch, handlebar magnet-mount power bank with LCD readout, a great all-purpose mount from SmallRig (link at bottom), a lightweight plastic handlebar mount, and the Mobius Maxi. Bag in top-right of case contains a few lightweight USB power cables of various lengths.
In addition to mounted dashcam and tailcam, this kit allows video from the side, down low, or any desired angle. 18650 charge unit (HSY H913-A) has readout, buck converter and 1200mAh battery in a case with two monster magnets for sticking on handlebars.
Since our primary focus here is mounting cams on motorcycles, we have problems to deal with that might not apply to other vehicles, starting with vibration and a phenomenon known as "CMOS wobble" - which is all but unavoidable. Camera size/weight and base mount are critical to minimizing the problem, but somewhere along acceleration curve it will rear its ugly head.
CMOS wobble occurs when motor rpm hits a harmonic frequency causing camera sensor to react with wavy video, and it's completely unpredictable. Even the smoothest engine is likely to trigger it briefly when going thru the gears. Using the short stainless mount, Vivitar's tiny 3 oz. CMOS cam seems to avoid it, tho I haven't really tested the Vivitar at high rpm. The much larger Drift cam recorded CMOS wobble right around 3700 rpm on a recent trip, but that is sure to change with different mount, location or camera. Just know that defeating vibration is one thing, but chasing CMOS wobble will probably be an ongoing battle. Not all motorcycles are the same in this regard, either. Mine happens to be smooth as silk, even at idle; only the mirrors get a bit blurry at high speeds. Some other bikes vibrate so much they're likely to beat a camera to death. The Mobius cams have been stellar in this regard, and body cams and helmet cams are naturally immune. CMOS wobble hasn't been noticeable, tho I know it has to be there somewhere.
|

References |
| Mobius Action Cam web site - All Mobius cams Tom Frank's Mobius1 cam pages - Site protocols, Mobius1 cam support Tom Frank's MobiusMini cam pages - Specs, pics, internals of the Mobius Mini Tom Frank's MobiusMaxi cam pages - Specs, pics, internals of the Mobius Maxi DashCamTalk MobiusMaxi - Site dedicated to Dash Cams, reviews and use |
Sources |
| B&H Photo and Video - A+ source for cameras, computers and accessories B&H M12 lens mount w/IR-cut filter - SKU = V-LH4-IR w/FIRC-650 filter B&H handheld Camcorders - great source, various brands, specs, prices B&H Sports and ActionCams - GoPro, DJI, Drift, Sony, countless others Drift cameras, US - Cams, vendors, accessories, features Gitup cameras - Stabilization in tiny F1 models, 90º, 130º, 160º lenses M12 Lenses - M12 lenses and mounts (most will need an IR-cut filter) Mobius Mini and Maxi cams on eBay - Eletoponline365 (direct source) SmallRig camera mounts - Outstanding mounts of all kinds Wasabi batteries and Chargers - from Blue Nook on Amazon |